


")
For creative entrepreneurs, understanding how to edit SEO in Showit can make a big difference in reaching your ideal audience. And although SEO can sound scary if you aren’t familiar with it, it’s actually pretty easy to add Showit SEO to your website. I’ll walk you through step-by-step how to add SEO in Showit. By the end of this blog, you’ll have a website that’s optimized for search success!
📌 PIN IT FOR LATER📌
Why I Prefer Showit for Web Design and SEO
Showit is my preferred platform for web design AND SEO. It’s how I designed my website, and it’s what I use for all my client projects. Showit is an incredible platform for aesthetics, ease of use, and it’s limitless design capabilities. Of all the web design platforms I’ve tried, Showit has the most versatile design features without requiring coding knowledge (huge win!).
There are a lot of questions out there about whether or not Showit is good for SEO. In my experience, it is! It’s all about how you optimize your website design and content. My biggest tip? Keep user experience in mind because that’s what Google cares most about! And, of course, learn how to edit SEO in Showit, which I’ll get to in just a minute!
How to Edit SEO in Showit + Best Practices
Alright, let’s learn how to edit your SEO in Showit and all the sections you need to complete before hitting publish! Make sure you are logged into Showit and have the Design App open so you can follow along.
SEO Title
This is the clickable headline in search results. It needs to be less than 60 characters, so write an SEO title strategically. Make it engaging and descriptive to entice users to click. This is where the main keyword you want your page to rank for should live. If you have some extra characters, you can add your brand name at the end.
To edit your SEO title in Showit, click ‘SEO settings’ in the right column. Write your SEO title in the ‘page title’ text box. It shows the character count as you write to make sure you don’t go over 60.
Meta Description
A meta description is the few sentences under the SEO title in search results. You get 160 characters for meta descriptions. This is where you can describe the content on the page in a little more detail. You should still naturally include your main keyword here.
To edit your meta description in Showit, click ‘SEO settings’ in the right column. Write your meta description in the designated text box. You won’t see the character count here, so I like to write meta descriptions in a character count tool like this to check how long it is before pasting into Showit.

Alt Text
Alt text is used to describe the image. It’s mainly used for accessibility purposes but is also important for SEO. If you write descriptive and accurate alt text, you might just show up in Google image search results! It doesn’t need to be super long, only about 125 characters.
To edit alt text in Showit, click on the image you want to edit. In the right column, click ‘image.’ Here, you’ll see ‘title’ and ‘alt text.’ This was recently updated from ‘SEO title’ and ‘description,’ so don’t freak out if you see one or the other! The SEO title is your title, and the description is your alt text. Got it?
In the title field, add a short and sweet title to help you search for images in your media gallery. Unlike alt text, it’s not super important for SEO. Then, write your description of the image in the second field. Here’s a handy little guide to writing Alt Text that will actually help your images be more accessible.

URL Slug
The URL slug is the text that comes after your domain (www.vineyardcreativeco.com/url-slug.) URL slugs should be short and sweet. Don’t worry about adding keywords unless they naturally fit. Blogs are a good example of when adding a keyword in the URL slug usually makes sense. One of your main pages, like your About page, doesn’t make sense to include a keyword. You would rather it just be /about to make it user-friendly and descriptive of the page.
To edit the URL slug, click on the page you want to optimize. In the right column, click ‘page info’. Click ‘page name’. In the popup, edit the page name, which edits the URL slug.
Be careful editing URL slugs. If you make a change and the old slug is linked somewhere else, you’ll create a broken link. Use Broken Link Check to make sure your website doesn’t have any broken links. Keep reading to learn how to create a redirect link so no one will encounter a 404 page!
Header Tags
Header tags (H1, H2, H3, etc.) hierarchically categorize the copy on a page. Headers are commonly used in design to engage users, but search engines also use them to decipher the important pieces of the content. As it crawls your page, it will recognize the importance of the text based on how you tag them, so we need to make sure those are correct in Showit!
To edit heading tags, click on the page you want to edit. Click a text box on the page. Navigate to ‘text properties’ in the right column. Select the tag you want to use for that section of text.
Again, what I love about Showit is that the design and header tags are independent of each other. In other platforms, if you tag text as an H2 tag, the design is adjusted based on your theme or customized settings. In Showit, you can design whatever you want and still tag text appropriately.
As a reminder, here is what each tag means and when to use it:
- div: This is a design element. While it’s still text, it doesn’t have SEO or contextual importance.
- H1: The most important text on the page, typically your page title. It should only be used one time towards the top.
- H2: The next most important text on the page. These are usually the main headers throughout the page.
- H3: Not always used, but if they are, the text is under H2 tags to provide additional detail and break up large chunks of text.
- nav: All the text in your navigation bars (main nav bar, footer, etc.) should be tagged with ‘nav’ to indicate that they are part of your website navigation system.
- p: This is for all the extra text on each page, including your buttons!
This is a tedious process, but trust me, it’s important for your SEO! Plus, once you do it, you never have to touch it again 😉
What About Blog SEO Settings?
If you decide to start a blog (which I highly recommend!), you’ll have to connect Showit and WordPress. Showit utilizes WordPress hosting for your blog, meaning you get all its powerful SEO capabilities and plug-ins to help ensure your posts are optimized. The design of your blog lives in Showit, while the SEO for your blog lives in WordPress.
Once you’ve made the connection, install the Yoast plug-in in WordPress. Yoast gives you guidelines for optimizing your blogs for search engines. I use it to double-check my work, but it’s also great for beginners learning SEO.
Remember that you have to use WordPress to edit metadata for blogs or blog templates in Showit. You’ll get a message telling you to edit SEO settings using Yoast in WordPress.
How to Set Up 301 Redirects in Showit
Redirect links prevent the inconvenience of landing on a broken link or a 404 page. Instead, users are automatically redirected to the new URL when they click an old URL. They won’t even know the difference, but this quick step can improve your SEO.
Here’s how to create a 301 redirect link in Showit.
- Log into your Showit account.
- Click ‘Site’ and then ‘Site settings.’
- Under the ‘site info’ tab, click ‘edit’ next to your custom domain.
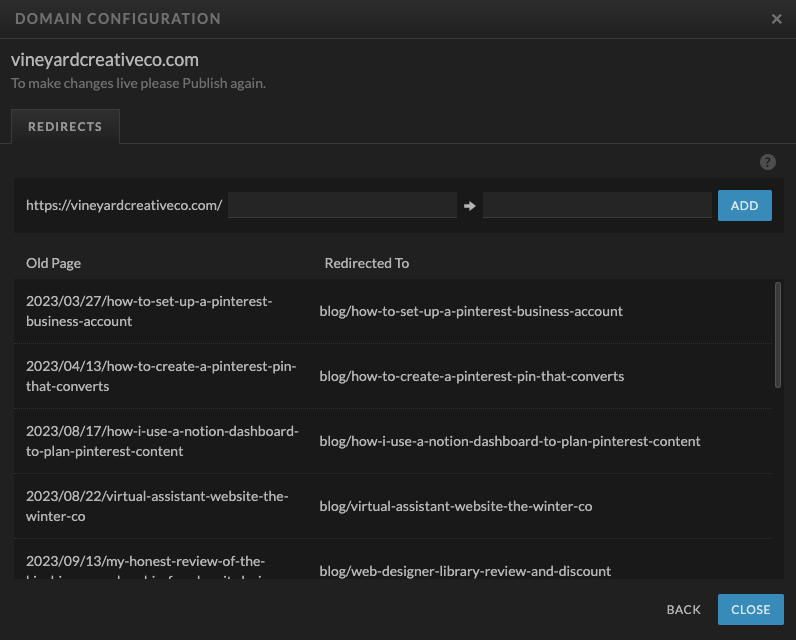
- Click the gear icon on the right-hand side.
- Grab the old URL slug (the text after your domain – www.vineyardcreativeco.com/url-slug) and put it in the first text box.
- Type the new URL slug into the second text box.
- Click ‘add’.
Click ‘close’ once you add all your 301 redirects in Showit. Don’t forget to publish your site so these changes go live!
Quick Check-In
Alright friend, how are you feeling?! I know this is a ton of information to digest, and if you aren’t super familiar with SEO best practices, it can feel a little overwhelming! I hope I made these steps easy for you to follow along with. If you still have questions, feel free to shoot me a DM!
You can also download my free Showit SEO checklist to make sure you have everything covered!
I have one more section for you. Now that you know how to edit SEO in Showit, I think it’s important to teach you how to track your SEO performance and when to consider making changes to your SEO settings. Are you ready?
Tracking Showit SEO Performance
I highly recommend you sign up for two free tools. They give you amazing insights into how your website is performing from an SEO perspective. Let me explain why these are the best website analytics tools and how to connect them to your Showit website.
Google Analytics
Google Analytics helps you understand how users interact with your website. You can see detailed data to better optimize your website for your audience. It’s a must-have SEO tool because it offers real-time data. You can see how many users are on your site at this exact moment! It also easily integrates with other Google tools, like Google Ads and Google Search Console. You get a complete picture of user behavior beyond just search traffic.
Create a free Google Analytics account. Click on ‘Start Measuring’ and follow the prompts to set up a new account and property. Choose Google Analytics 4 (GA4) for the latest version.
After you set up the property, go to Admin, Data Streams, and Web. Here, you will add your Showit URL. Copy the Measurement ID (it starts with ‘G-’).
Now, log in to your Showit account. Go to ‘site settings’ on the left control panel. Click the ‘third-party’ tab and paste your measurement ID in the textbox. Don’t forget to save!
Google Search Console
Google Search Console helps you understand how Google views your website. This is the only place to receive direct feedback from Google on how your site performs in search results. There are other SEO tools that give you different metrics, but this one comes directly from Google, which is invaluable. You can see recommendations on how to improve your SEO and monitor issues with getting your pages indexed.
Create a free Google Search Console account. Click ‘add property’ and choose the URL prefix. Paste your Showit site URL, including https://. Under alternate methods, select ‘HTML tag.’ Copy the meta tag provided by Google. It will look something like this:
<meta name=”google-site-verification” content=”…”>
In Showit, navigate to your home page. Select ‘advanced settings’ on the right-hand side and paste the meta tag under ‘custom head HTML.’ Publish and save the changes.
Go back to Google Search Console and click ‘verify.’ If all the steps were completed correctly, Google will confirm the website’s ownership.
Wrapping Up How to Edit SEO in Showit
Whew! Is your head spinning? Knowing how to edit SEO in Showit is crucial for improving your website’s visibility and driving organic traffic. I hope you learned how to do exactly that!
Part of my job as a web designer is setting up all this for my clients. I perform keyword research, write strategic SEO metadata, and integrate SEO tools to make sure their website is well-optimized. Then, I teach them how to make edits themselves later on! If you’re ready to transform your business with an authentic, show-stopping online presence designed to attract and convert your dream audience, let’s chat in a discovery call!

AFFILIATE DISCLOSURE
Some links across my website may be affiliate links, meaning I receive a portion of any sales made through them. I never recommend any product or service that I don't wholeheartedly believe in and use in my own business.


BRAND PHOTOGRAPHY | WEBSITE - Yours Truly!
© vineyard creative co 2026
